Know your camp kitchen
Three ways to a great trail meal.
Our categories describe how a recipe cooks. Choose Bowl Cozy for hot-water soaking, Jetboil MiniMo / TrailCook for meals that need a controlled flame, or No-Cook for meals mixed without heating. Each approach has its place outdoors.
| What matters | Bowl Cozy | Jetboil MiniMo / TrailCook | No-Cook |
|---|---|---|---|
| Heat source | Boil water, then turn off the stove. Insulation slows cooling while food hydrates. | Keep the pot over a controlled flame for boiling, simmering, and cooking. | No heat needed. Mix ready-to-eat ingredients or use cold drinking water for recipes that soften without heat. |
| Best ingredients | Instant starches, small freeze-dried vegetables, and ready-to-eat proteins. | Noodles, uncooked rice, vegetables, sauces, and meals needing sustained heat. | Ready-to-eat pouches and tins, tortillas, rolled oats, dried fruit, and drink powders. |
| Fuel and attention | Usually less burner time for a suitable meal; mostly hands-off soaking. | Usually more burner time and stirring, with more control over texture. | No stove fuel. Mix and eat right away or allow time for a cold soak. |
| Cleanup | The water pot stays clean; wash the eating bowl and spoon. | Wash the cooking pot, spoon, and any separate serving bowl. | Wash the bowl, jar, or shaker and any utensils you used. |
| Main tradeoff | Simple and convenient, but ingredient choice matters. | More cooking flexibility, with more supervision and a greater risk of sticking. | Easy to prepare on the move, with fewer options for ingredients that need heat to soften or cook. |
Boil. Cover. Let it rest.
Bowl Cozy cooking
What is a bowl cozy?
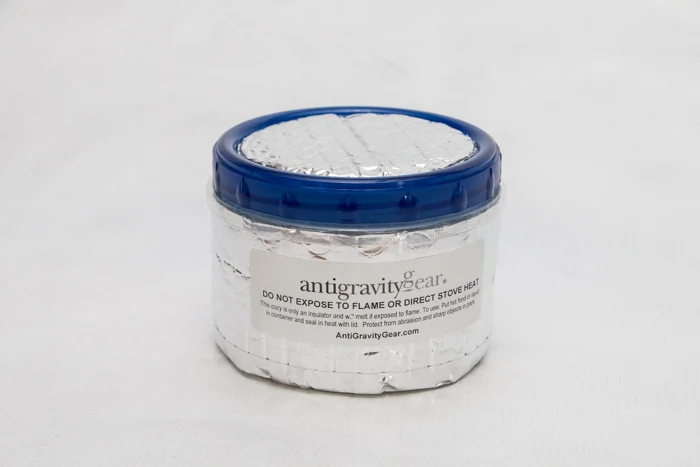
A cozy is an insulating sleeve or enclosure around a food-safe bowl. Common designs use closed-cell foam, reflective insulation, or insulated fabric. A cover helps retain warmth at the top. The bowl holds the food; the cozy slows heat loss. It supplies no heat of its own and is never placed on a burner.
In these recipes, “bowl cozy” means the bowl-and-insulation setup. Put ingredients and water in the bowl, never directly in the insulating material. Select a bowl and lid explicitly suitable for the water temperature you will use. An ordinary fabric bowl holder may protect your hands without retaining enough heat for a long soak.
Why use one?
Once the water boils, you can turn off the stove and let the covered meal hydrate while you enjoy the view. Less time burning fuel can reduce fuel use compared with simmering the same suitable ingredients, although savings depend on weather, water volume, and the recipe. The bowl also keeps dinner warm while you eat, and food cannot scorch against a lit burner during the soak.
Why I favor a bowl over a bag
I’m not a fan of eating out of bags, so I favor a bowl cozy over an insulated food pouch. I like having a proper bowl to stir and eat from—it makes a trail meal feel more like dinner.
If you don’t mind eating from a bag, you can substitute a pouch cozy for the bowl-style setup in these Bowl Cozy recipes. Put the food and hot water in a food-safe cooking pouch explicitly rated for boiling water, then place that pouch inside its insulating cozy. The cozy itself never holds the food or water. Choose a pouch with enough room for the hydrated meal and stirring, follow its instructions, and check hydration before eating; a different shape or level of insulation may change the soaking time.
My pick: AntiGravityGear 2 Cup Bowl Cozy
I consider the AntiGravityGear 2 Cup Bowl Cozy the best solo bowl cozy available. It suits the way I like to eat on the trail: from a proper bowl, with easy access for stirring and getting the last bite, rather than digging into a food bag.
AntiGravityGear lists a weight of just 1.8 oz and dimensions of 3.5 inches high by 4.5 inches in diameter, making it a compact addition to a solo cook kit. The bowl has measurement markings for adding water, is easy to clean, and has a secure lid for packing. Its insulation slows cooling while suitable instant ingredients rehydrate and helps keep dinner warm while I eat. For these meals, I can boil the water, turn off the stove, and let the covered bowl and cozy handle the soaking—keeping food out of my water pot and reducing burner time.
The 2-cup size is my choice for compact single servings, but allow room for the food to expand and for stirring; a bulky meal may need a larger bowl. Follow the container’s temperature and lid instructions, and check each recipe’s hydration rather than assuming insulation can replace cooking for every ingredient.
Choose ingredients that soften quickly
Instant couscous, instant mashed potatoes, stuffing mix, and suitable precooked instant noodles work well. Small freeze-dried vegetables generally hydrate more readily than thick, conventionally dehydrated pieces. Use fully cooked, ready-to-eat pouch meat or fish. Uncooked rice, raw meat, and dried beans need a different cooking process; extra soaking alone is not a reliable substitute.
What is Onisi Alpha Rice?
Onisi Alpha Rice is Japanese rice that has already been cooked and then rapidly dried. Add hot water and it rehydrates into fluffy rice without simmering—making it especially useful in bowl cozy meals. Unlike ordinary uncooked rice, it only needs water and resting time. Onisi uses a drying process designed to preserve the cooked grains’ texture.
For Onisi Plain Alpha Rice, a 100 g dry pouch yields approximately 260 g prepared rice after about 15 minutes with hot water. A 50 g portion therefore needs roughly 80 ml water on its own and yields about 130 g prepared rice. When you add freeze-dried meat or vegetables, use the larger water quantity specified in the recipe and check hydration before eating. Other Onisi varieties can have different directions. Learn about Alpha Rice from Onisi Foods ↗
Why choose Onisi over other instant rice?
For my bowl cozy recipes, the biggest advantage is texture without burner time. Onisi rapidly dries already-cooked Japanese rice in a way designed to preserve distinct, pleasantly chewy grains. I prefer that result for rice bowls, where the rice should feel like rice rather than a soft, broken-down starch. You simply add hot water and leave it covered for about 15 minutes, so the stove can be turned off as soon as the water boils.
Some conventional instant rice also rehydrates without simmering and may be cheaper or faster, so Onisi is not automatically better for every meal. Its particular appeal is the combination of Japanese-style rice texture, predictable hot-water preparation, and compact dry storage. Unlike a ready-to-eat wet rice pouch, you do not carry the water weight. Unlike uncooked rice, you do not need a sustained simmer. For a lightweight bulgogi or teriyaki bowl in a cozy, that makes it my preferred choice.
Build a dependable routine
Measure ingredients at home. At camp, add the recipe’s hot water, stir into the corners, cover, and close the cozy. Check at the stated time. Add a little hot water if the mixture is dry; keep it covered longer if suitable instant ingredients remain firm. Cold ingredients, wind, and a poorly fitting cover can cool the meal faster. Test a new combination at home before relying on it on a trip.
Size the bowl for the hydrated meal with room to stir. Dry volume alone is misleading because starches expand. Follow the bowl’s care instructions, allow steam to vent, and avoid sealing hot contents airtight. Wash and dry both bowl and cozy after use.
Turn down the flame. Cook dinner.
Jetboil MiniMo / TrailCook
Some trail meals need a steady simmer. A regulated burner lets you bring water to a boil, then turn down the flame so rice, sauces, and stews cook gently.
I recommend the Jetboil MiniMo or TrailCook for these recipes. Both let you dial down the flame, and their FluxRing heat exchangers help transfer heat from the burner to the pot.
If you choose to use a different pot and stove combination, pay particular attention to two things: the stove’s ability to maintain a steady, low flame and the pot’s ability to distribute heat evenly. Aluminum pots and stainless steel pots with an aluminum base are excellent choices, while thin titanium pots tend to develop hot spots that can turn thick sauces and starchy meals into a scorched mess. Equally important is the stove itself. Many ultralight backpacking stoves have limited simmering capabilities, particularly in cold weather. Some seem to offer just two settings: “blast furnace” and “off.” That’s perfectly fine when all you want to do is boil water, but considerably less helpful when you're trying to prepare dinner without welding it to the bottom of your pot.
Backpacking stove comparison
Here's how twelve popular canister stoves compare for active camp cooking. Maximum heat is handy for getting water boiling, but a dependable low flame is what keeps dinner from becoming a permanent part of the cookware. I have personal experience with all of these stoves, and can attest to the simmering capabilities of each.
| Stove | Weight | Heat output | Regulator | Igniter | Simmer | Wind |
|---|---|---|---|---|---|---|
| Jetboil TrailCook 2.0L | 630 g | 1,800 W | Yes | Yes | Excellent | Good |
| Jetboil TrailCook 1.2L | 550 g | 1,800 W | Yes | Yes | Excellent | Good |
| Jetboil MiniMo 1.0L | 415 g | 1,750 W | Yes | Yes | Excellent | Good |
| SOTO WindMaster | 67–87 g | 3,260 W | Yes | Yes | Very good | Excellent |
| SOTO Amicus | 75–81 g | 3,260 W | No | Optional | Good | Very good |
| MSR PocketRocket 2 | 73 g | 3,900 W* | No | No | Good | Fair–good |
| MSR PocketRocket Deluxe | 83 g | 3,500 W* | Yes | Yes | Very good | Very good |
| Fire-Maple Polaris | 76 g | 2,500 W | Yes | No | Good | Good |
| Fire-Maple Polaris Remote | 180 g | 2,900 W | Yes | No | Good | Fair–good |
| Fire-Maple GreenPeak II | 95 g | 2,600 W | Yes | Yes | Good | Fair–good |
| Fire-Maple GreenPeak Pro | 95 g | 2,100 W | Yes | Yes | Good | Fair–good |
| Campingmoon XD-2F | 100 g | ~3,300 W† | Yes | Yes | Not rated | Good |
Jetboil weights include the pot and cooking system; all other weights are for the stove alone. Wind and simmer ratings are qualitative judgments informed by my cooking experience, burner design, and manufacturer descriptions—not standardized head-to-head tests. “Excellent” simmer control means fine, sustained low-heat adjustment; “good” means the flame can be lowered but may need attention. The XD-2F's simmer capability is not separately rated here. *MSR figures are nominal input ratings from its manuals, measured under different standards than some other listings, so wattages are not necessarily directly comparable. †The XD-2F's approximately 3,300 W rating appears in retailer specifications, but is not confirmed on Campingmoon's individual product page. A pressure regulator helps maintain output as canister pressure drops; it is not the same as an ordinary flame-adjustment knob. Product details should be checked against the current manufacturer's instructions.
My take: MiniMo versus TrailCook
The MiniMo is now out of production, which I think is a shame. Its compact 1-liter format is a big part of its appeal for solo meals, especially compared with the larger 1.2-liter and 2-liter TrailCook models. I’d have liked to see that smaller size stay in the lineup. MiniMo in Jetboil’s discontinued range ↗
That said, I have to give the TrailCook credit: its ceramic nonstick cooking surface is a superior option for food release and easier cleanup, and I consider its redesigned pot lid a major improvement over the MiniMo’s. The easy on/off design makes it more convenient to lift the lid, stir, and check a simmering meal. I still favor the MiniMo’s compact size, but the TrailCook brings welcome improvements to the actual cooking experience. TrailCook coating and lid details ↗
Jetboil MiniMo
The MiniMo pairs a short, wide 1-liter pot with a regulated burner offering fine heat adjustment. Its shape makes stirring and eating from the pot convenient. It suits compact solo meals such as noodles, rice bowls, and small portions of stew. A nominal 1-liter capacity does not mean you can safely boil a full liter: follow the pot’s marked fill limit and leave space for stirring and foaming.
For thick meals, start with enough liquid and lower the flame promptly. Stir across the bottom, especially as starch absorbs water. Simmer control reduces the need for aggressive boiling but cannot prevent scorching by itself. Alternate cookware requires the appropriate Jetboil Pot Support; follow the manual’s cookware limits. MiniMo instructions ↗
Jetboil TrailCook 1.2L
TrailCook adds a ceramic-coated 1.2-liter pot, a self-centering support, folding grip handle, and rotary turn-and-click ignition. Regulated flame adjustment supports gentle simmering as well as boiling. The pot lifts off the support for stirring and serving; its lid supports pouring and straining when held as directed.
Jetboil positions this size for one or two people. It offers extra nominal capacity compared with the MiniMo, useful for bulky solo meals. The coating helps with food release and washing, but still needs careful heat control and gentle utensils. TrailCook 1.2L details ↗
Jetboil TrailCook 2.0L
The 2-liter version provides more room for shared meals; Jetboil lists it for two to four people. It also has a ceramic-coated pot, regulated burner, rotary ignition, and self-centering support, with folding handles and a lid designed for straining. The larger pot makes group portions easier, but takes more pack space. Our recipes serve one unless stated otherwise; owning a larger pot does not change their ingredient quantities. TrailCook 2.0L details ↗
Why choose active cooking?
Sustained heat gives you more flexibility with ingredients and more opportunities to adjust doneness, sauce thickness, and water. You can soften vegetables before adding noodles or finish a sauce at a gentle simmer. Expect to stay by the stove and stir. Use the recipe as a starting point and check the food rather than assuming identical timings across different pots.
Use these stoves outdoors on a stable, level surface, never inside a tent. Follow fill markings and the model’s fuel and setup instructions. Do not heat an empty pot or enclose the canister in a windscreen. For TrailCook, avoid deep frying and stir food frequently to limit scorching. TrailCook instructions ↗
Just assemble and enjoy
No-Cook trail meals
No-Cook recipes need no burner or boiling water. They're ideal for cold shakes and ready-to-eat wraps. Pack shelf-stable ingredients ahead of time, then add drinking water to a shake or assemble a wrap at your lunch stop. Eat promptly and clean any mixing container afterward. Unlike Bowl Cozy meals, these recipes do not depend on retained heat.
Try the Chocolate Peanut Butter Breakfast Shake → · Try the Buffalo Chicken Ranch Wrap →
Can you switch methods?
A MiniMo or TrailCook can boil water for any Bowl Cozy recipe; the label describes the meal’s finishing method. You can often prepare suitable cozy ingredients in a pot with the burner off and lid on, but an uninsulated pot may cool faster. Converting an active-cooking recipe to a cozy requires more care: replace ingredients needing sustained cooking with instant or fully cooked equivalents, then test water quantity and soaking time. Do not simply remove the simmering step.
For an instant hot meal, choose a Bowl Cozy recipe. For fresh ingredients, uncooked grains, or closer texture control, choose active cooking. For a quick shake without a stove, use No-Cook.
Product information checked October 24, 2026, against Jetboil product information and manuals linked above. Recipe adaptations are kitchen guidance, not manufacturer performance guarantees.
Find your next trail meal →